How to sell on Magento
Magento is an open source eCommerce online store builder that provides you with anything from hosting, domain, so that anyone can sell online.
What are different between marketplace and magento?
Magento and marketplace both are different things. For Examples Amazon, eBay and other web store is a marketplace where you can sell your products by listing. But magento is an ecommerce platform that helps to create, design, and manage your eCommerce websites.
How to setup Magento on server
There are two main ways to install Magento.
1 . The fastest and easiest one is to use the auto installer available in cPanel.
2 . Manually Magento Installation.
Manual Magento Installation
STEP 1:
The first thing you need to do is to install the Magento manually and download the latest installation package from the official Magento website.
STEP 2:
Next, you must upload the installation package on your hosting account through your cPanel -> File Manager or using an FTP client.
Note:
In case you want the Magento installation to be primary for your domain (i.e. to run from http://yoursite.com), you need to extract the content of the installation package in the public_html folder. On the other hand, if you want it to be in a subfolder.
Once you upload the package, you can extract it through your cPanel -> File Manager.
STEP 4:
Create a MySQL database and assign a user to it through cPanel -> MySQL Databases. Remember the database details, since you will need them during the script installation.
STEP 5:
Go through the Magento installation process.
Configure Magento
1 . If you installed Magento to the html directory, then navigate to your domain in your web browser.
2 . Read the license agreement. If you agree, click the check box and then click Continue.
3 . The next menu displays the localization settings for your store. Select the appropriate settings for your store and click Continue.
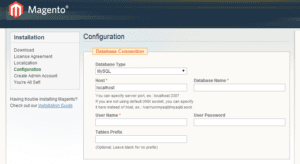
4 . Configure Magento to work with your database (See below Figure). Leave the Database Type and Host fields on the default settings.
4 . Enter the Database Name, User Name, and User Password in the corresponding fields. For Database Name and User Name, Leave the Tables Prefix field blank
or you can enter your own prefix. This is useful if you plan to use one database for multiple stores in Magento.
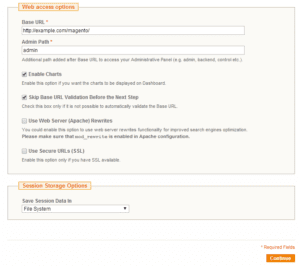
5 . The Web access options menu controls how you access your store and administration panel. Do not change the base URL, or your Magento store will not render correctly. You may, however, change your administrator path.
6 . Continue to refer to below Figure for the check box options:
In the above Figure. Web access options menu.
(a) Select Enable Charts if you want to use the charting feature.
(b) Select Skip Base URL Validation Before the Next Step.
(c) Leave Use Web Server (Apache) Rewrites unchecked.
(d) Unless you already have an SSL installed, leave Use Secure URLs (SSL) unchecked.
(e) Under Save Session Data In, set it to File System.
(f) Click Continue.
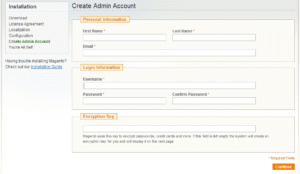
8 . As shown in the below mention Figure, the next page will help you configure your administrator settings.
In the above Figure. Administrator settings.
9 . In the Personal Information fields, type your first and last name and an email address. Magento will contact you regarding future updates.
10 . In the Login Information fields, type a username and password. Refer to How to generate a secure password for more information.
11 . Leave the Encryption Key section blank.
12 . Click Continue to complete installation. Note the encryption key provided.
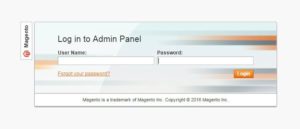
STEP 01: First we need to login your magento account. After login you can access admin panel for managing you magento web store.
Login Page
Note: Enter User Name and Password then click on Login to access admin panel.
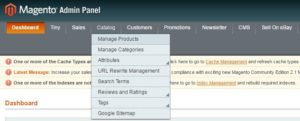
STEP 02: To create a new product, you will first need to navigate to the Manage Products page by going to Admin Panel > Catalog > Manage Products. From here, you can select the Add New Product button in the upper-right area of the page to initiate the creation of a new product.
Admin Panel > Catalog
Admin Panel > Catalog > Manage Products
Admin Panel > Catalog > Manage Products > Add Product
The Product Settings page allows you to assign an Attribute Set and Product Type to the new product. It is important to remember here that once an attribute set is assigned to the product, it cannot be changed. This set adds a number of variables to the product that impact how it is listed and sorted in your store.
Magento store comes with six different product types.
1 . Simple Products
2 . Grouped Products
3 . Configurable Products
4 . Virtual Products
5 . Bundled Products
6 . Downloadable Products
Simple Products: As you can guess from its name, it is a physical good that is sold at the store. This one is the most common among all Magento product types. Simple product is recommended to be used for a single unit with no special selectable options. Every item has own SKU (Stock Keeping Unit), price and inventory. However, Custom Options available, store administrator can add necessary options with a set price for the customers to select, e.g.: color, warranty etc.
Example: Samsung Guru Music Mobile in Blue
Grouped Products: This one refers to the set of simple products. Usually, those are goods with the same features, related to each other. Magento grouped products comes in handy with the items that accomplish them. It means that instead of buying a memory card, USB, and a device, a customer will get all three by making a single purchase which is very convenient.
Example: Pen drive + Card Reader + Memory Card
Configurable Products: A Configurable product in Magento is a combination of simple products. Configurable Products are introduced to provide options to the ecommerce customers to choose and build their product. Since each variant is considered as a simple product in this practice, you can maintain the inventory separately for each variant.
For example, a bag comes in three colors and two sizes. In this example we will have a single Configurable product with two options: size and color. That ties six simple products:
Small Bag in Red Color.
Small Bag in Blue Color.
Small Bag in Green Color.
Medium Bag in Red Color.
Medium Bag in Blue Color.
Medium Bag in Green Color.
Virtual Products: This product type is for services that have neither physical nor digital representation, i.e. they don’t need to be shipped or provided for downloading. For example, if you want to offer services such as newsletter subscriptions or phone support, you would add them as virtual products.
Bundled Products: This type will allow you to customize a product based on a number of configurable options; for example, if you want to sell different laptops with configurable options such as CPU model, amount of RAM, HDD size, etc., you would add them as bundle products.
Downloadable Products: This product type allows you to add different digital products and sell them to your customers by providing a download link for each product; for example, if you want to sell software, music, or movies, you would add them as downloadable products.
After section of attribute and product type click on continue button. Now new window is open there is many tab.
Admin Panel > Catalog > Manage Products > Add Product
General Tab: The General tab gives you access to the primary aspects of your product. Its name, SKU, status, description, and visibility can be set in this menu.
Price Tab: The Price tab gives you access to set the product’s price, special price, a data range for the special price, its cost, tax class, and tiered price.
Meta Information Tab: Meta Information is all about search engine optimization (SEO). This is where you set the Meta keywords, description, and title for your product page.
Images Tab: Images are a very important selling point for your product. In fact, Magento requires three images per product. You will need base, small, and thumbnail images for your product. If you do not upload an image to meet these requirements, a default one is used.
Recurring Profile: This tab allows you to enable or disable Recurring Profile for this product. Products with recurring profiles participate in the catalog as nominal items.
Design: The Design tab gives you the ability to modify the look of individual product pages. The product design overrides any design changes made to the category design option. You can use the Active From and Active to options to make this design change temporary. This is handy when a product is new and you would like to theme the individual product page to feature it in a different light than other items in your inventory.
Gift Options: The Gift Options tab gives you the ability to allow or disallow gift messages in relation to the product.
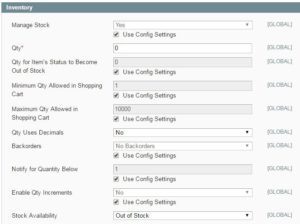
Inventory: The Inventory tab is where you can go to set the initial stock quantity for the product, minimum quantity allowed in shopping carts, minimum quantity for the item to appear in stock
Websites: This tab is especially useful for Magento installs with multiple websites and/or stores. Here, you will be able to assign your product to the site(s) you wish to have it sold in.
Categories: This is where you assign the product to a category / subcategory. A product can be assigned to multiple categories.
Related Products: Related Products allows you to let Magento know if there are any related products that would be worth promoting within the new product’s page.
Up-Sells: Do you have any additional products that would be complementary to the product? This is where you would put them. If the customer is buying a new camera, an appropriate up-sell would be a strap, memory card, or a lens.
Cross-Sells: Cross-sells appear in the shopping cart. As your customer is checking out, it is one last potential way to turn a small order into a larger one. If your online store was a physical store, this would be the candy next to the cash register.
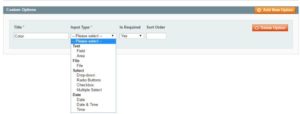
Custom Options: You can add any custom options (such as details your staff would be able to fulfill) here. If you have a limited number of SKUs, this would be a good place to put variables (such as shirt size, color, etc.) in the event that you want these variations to appear under a single SKU.
Admin Panel > Catalog > Manage Products > Add Product> General
General Tab: it’s gives you access to the primary aspects of your product. Its name, SKU, status, description, and visibility can be set in this menu.
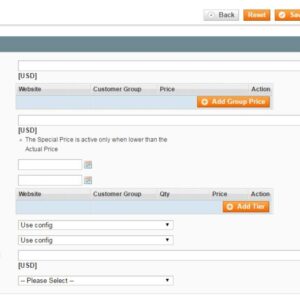
Admin Panel > Catalog > Manage Products > Add Product> Price
Price Tab: The Price tab gives you access to set the product’s price, special price, a data range for the special price, its cost, tax class, and tiered price.
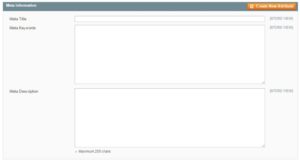
Admin Panel > Catalog > Manage Products > Add Product> Meta Information
Meta Information Tab: Meta Information is all about search engine optimization (SEO). This is where you set the Meta keywords, description, and title for your product page.
Admin Panel > Catalog > Manage Products > Add Product > Images
Images: Images are a very important selling point for your product. In fact, Magento requires three images per product. You will need base, small, and thumbnail images for your product. If you do not upload an image to meet these requirements, a default one is used.

Recurring Profile: This tab allows you to enable or disable Recurring Profile for this product. Products with recurring profiles participate in the catalog as nominal items.
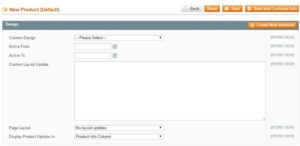
Admin Panel > Catalog > Manage Products > Add Product> Design
Design: The Design tab gives you the ability to modify the look of individual product pages. The product design overrides any design changes made to the category design option. You can use the Active From and Active to options to make this design change temporary. This is handy when a product is new and you would like to theme the individual product page to feature it in a different light than other items in your inventory
Admin Panel > Catalog > Manage Products > Add Product> Gift Options
Gift Options Tab: The Gift Options tab gives you the ability to allow or disallow gift messages in relation to the product.
Admin Panel > Catalog > Manage Products > Add Product> Inventory
Inventory Tab: The Inventory tab is where you can go to set the initial stock quantity for the product, minimum quantity allowed in shopping carts, minimum quantity for the item to appear in stock.
Admin Panel > Catalog > Manage Products > Add Product> Website
Websites Tab: This tab is especially useful for Magento installs with multiple websites and/or stores. Here, you will be able to assign your product to the site(s) you wish to have it sold in.
Admin Panel > Catalog > Manage Products > Add Product > Categories
Categories Tab: This is where you assign the product to a category / subcategory. A product can be assigned to multiple categories.
Admin Panel > Catalog > Manage Products > Add Product> Related Products
Related Products Tab: Related Products allows you to let Magento know if there are any related products that would be worth promoting within the new product’s page.
Admin Panel > Catalog > Manage Products > Add Product> Up-Sells


Up-Sells Tab: Do you have any additional products that would be complementary to the product? This is where you would put them. If the customer is buying a new camera, an appropriate up-sell would be a strap, memory card, or a lens.
Admin Panel > Catalog > Manage Products > Add Product> Cross-Sells
Cross-Sells Tab: Cross-sells appear in the shopping cart. As your customer is checking out, it is one last potential way to turn a small order into a larger one. If your online store was a physical store, this would be the candy next to the cash register.
Admin Panel > Catalog > Manage Products > Add Product> Custom Option
Custom Options Tab: You can add any custom options (such as details your staff would be able to fulfill) here. If you have a limited number of SKUs, this would be a good place to put variables (such as shirt size, color, etc.) in the event that you want these variations to appear under a single SKU.
How to create a configurable product
Configurable Products: A Configurable product in Magento is a combination of simple products. Configurable Products are introduced to provide options to the ecommerce customers to choose and build their product. Since each variant is considered as a simple product in this practice, you can maintain the inventory separately for each variant.
For creating a configurable product you should follow the below mentions steps:
- Log in to your Magneto admin panel
- Select the “Catalog” tab
- Click “Manage Products”
- And then click the “Add Product” button to add a new product
- Select the attribute set and the product type “Configurable product”


- Type the product information


- Once you’ve entered the “Associated Products” page, click the “Save And Continue Edit” button

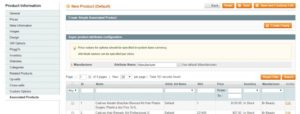
- You can see the area where you can create simple products with the same information as the configurable product but with different values of the chosen attribute.
- Here you can create the products with different attribute values. Make sure that these products are not visible.
- Set the price for each attribute value. Note that you can select 2 types of prices. Fixed value that is added to the product price or percentage of the initial product price.
- Save the product
How to create a Group Products
Grouped Products: This one refers to the set of simple products. Usually, those are goods with the same features, related to each other. Magento grouped products comes in handy with the items that accomplish them. It means that instead of buying a memory card, USB, and a device, a customer will get all three by making a single purchase which is very convenient.
Example: Pen drive + Card Reader + Memory Card
For creating a group product you should follow the below mentions steps:
- Log in to your Magento admin panel
- Select the “Catalog” tab
- Click “Manage Products”
- And then click the “Add Product” button to add a new product
- Select the attribute set and the product type “Group Products”
Virtual Products: This product type is for services that have neither physical nor digital representation, i.e. they don’t need to be shipped or provided for downloading. For example, if you want to offer services such as newsletter subscriptions or phone support, you would add them as virtual products.
For creating a Virtual product you should follow the below mentions steps:
- Log in to your Magento admin panel
- Select the “Catalog” tab
- Click “Manage Products”
- And then click the “Add Product” button to add a new product
- Select the attribute set and the product type “Virtual Products”
- Type the product information
- Set Price, Add Description, Set Inventory, Select Website, Assign Product Categories.
- Save the Products.
How to Create a Bundled Products
Bundled Products: This type will allow your clients to customize a product based on a number of configurable options; for example, if you want to sell different laptops with configurable options such as CPU model, amount of RAM, HDD size, etc., you would add them as bundle products.
For creating a bundled product you should follow the below mentions steps:
- Log in to your Magento admin panel
- Select the “Catalog” tab
- Click “Manage Products”
- And then click the “Add Product” button to add a new product
- Select the attribute set and the product type “Bundled Products”
- Type the product information
- Set Price, Add Description, Set Inventory, Select Website, Assign Product Categories.
- After you’re done with all the basic settings it’s time to add the products within the bundle. To do this click on the Bundle Items tab on the left. On the page that opens you’ll see sections labeled Shipment and Bundle Items.
- After completed the bundle items save the products.
How to Create a Downloadable Products
Downloadable Products: This product type allows you to add different digital products and sell them to your clients by providing a download link for each product; for example, if you want to sell software, music, or movies, you would add them as downloadable products.
For creating a bundled product you should follow the below mentions steps:
- Log in to your Magento admin panel
- Select the “Catalog” tab
- Click “Manage Products”
- And then click the “Add Product” button to add a new product
- Select the attribute set and the product type “Bundled Products”
- Fill all the Required Information.
- Save the Products.


